On this page
Last checked: 29 October 2026
Badminton becomes easier to follow when you stop treating every return as the same hit. The incoming shuttle gives you a height and a position. Your job is to choose a useful destination and send it there with control.
You do not need six polished shots before playing. Understanding what each one does helps you practice with a purpose—and recognize why a soft return can sometimes be more useful than a hard one.
How do the six basic badminton shots differ?
The clearest distinction is the shot's starting point, flight, and intended destination. Clears, drops, and smashes commonly use overhead contact from farther back. Lifts and net shots are common near the front. Drives use a flatter path through the middle of the court.
Shot | Typical contact | Intended flight and destination |
|---|---|---|
Clear | Overhead, usually from rear court | High and deep for a basic defensive clear |
Drop | Overhead from rear court | Down toward the opponent's front court |
Smash | High overhead contact | Fast and downward into the court |
Drive | In front or beside you, around net height | Flat toward the opponent's middle or rear court |
Lift | Below net height, often in front court | Upward toward the opponent's rear court |
Net shot | Near the net, in front of you | Softly across into the opponent's front court |
These are starting descriptions, not fixed court coordinates. Players vary height, speed, angle, and placement. The diagram shows simplified paths rather than exact trajectories.
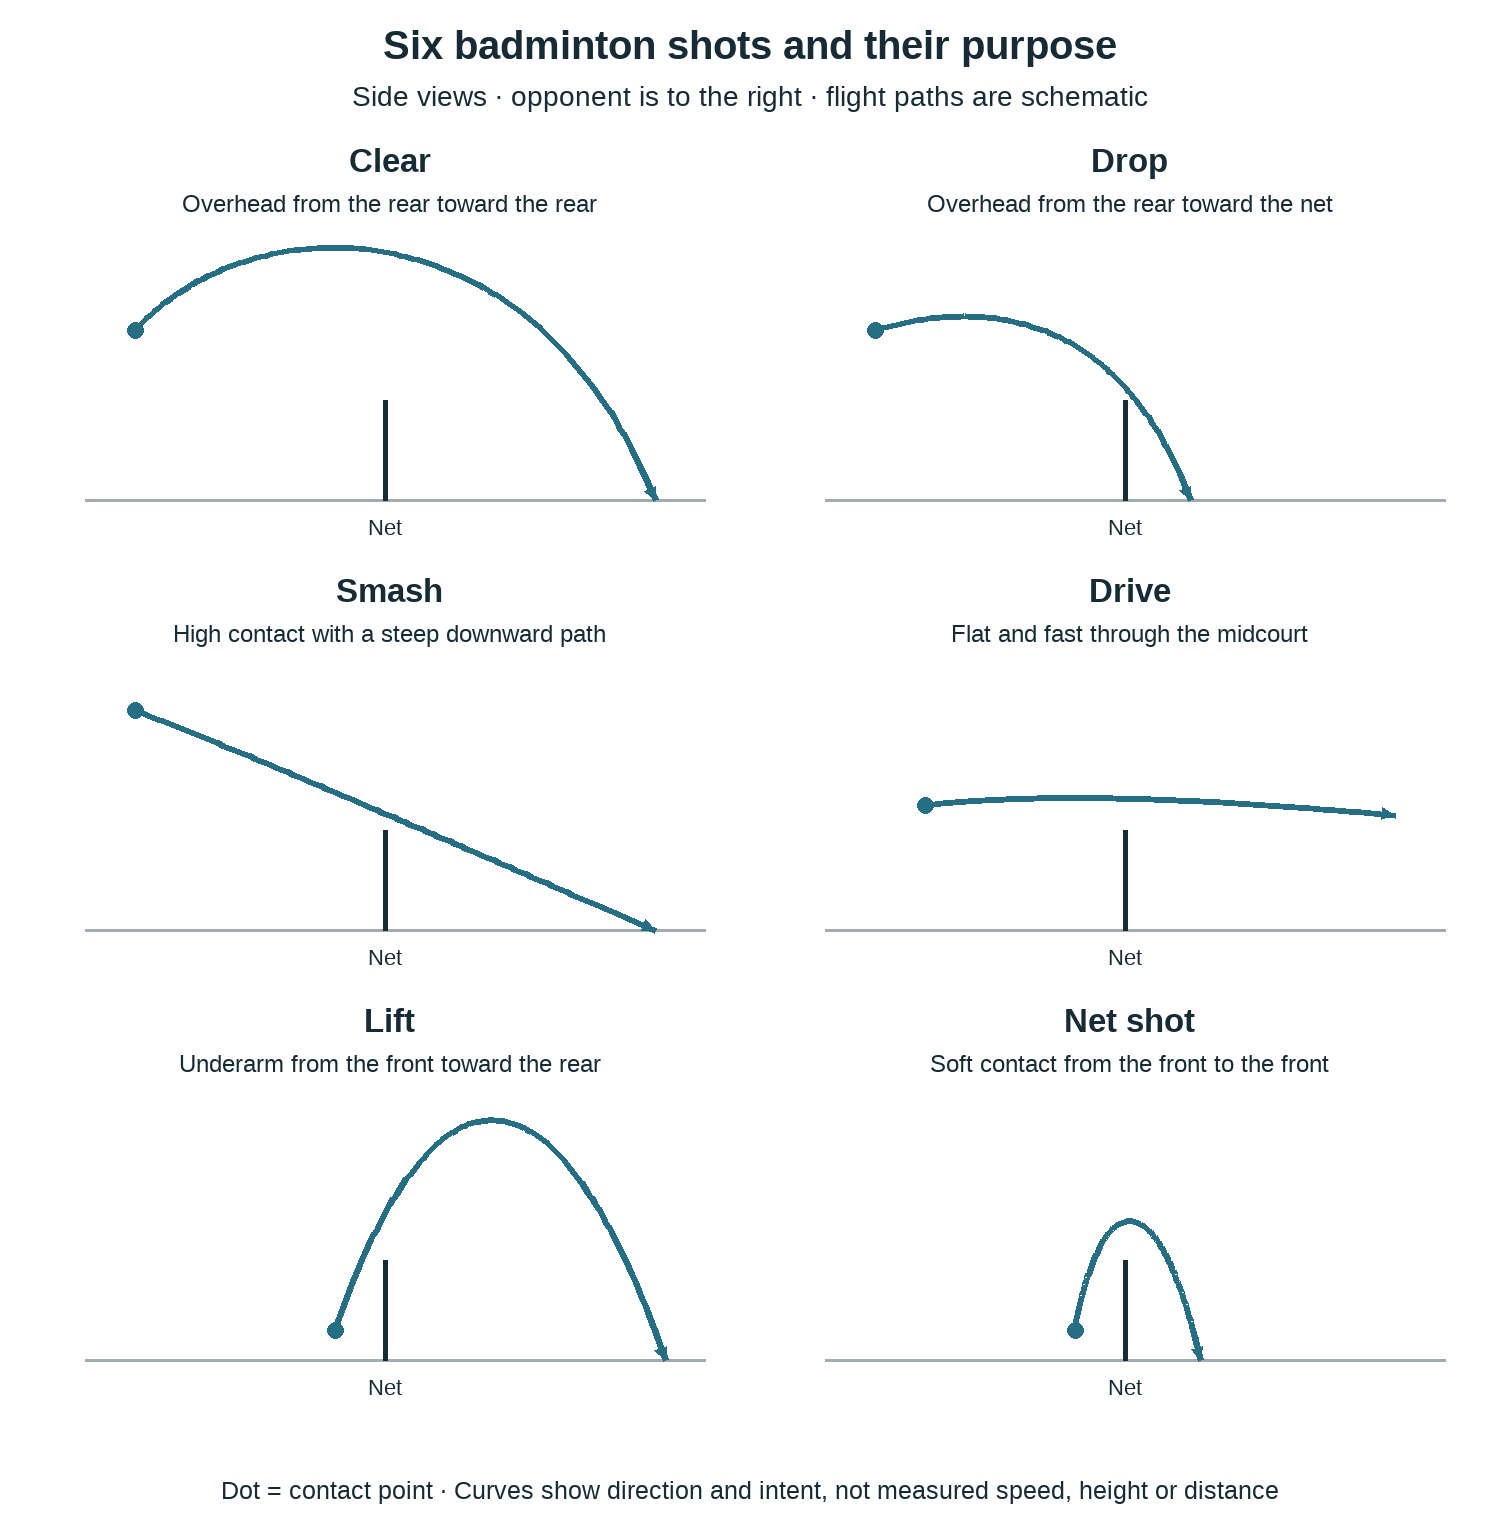
The BWF Shuttle Time manual, Module 8 explains tactics through creating and using space. Rear-to-front shots can bring an opponent forward; front-to-rear shots can move them back. Start by recognizing that change in space.
What does a clear do, and how should you start?
A clear sends an overhead shuttle toward the opponent's rear court. A high defensive clear gives both players time to reposition. Use it when you can get behind the incoming shuttle and want depth rather than an immediate downward attack.
Start: Turn side-on and prepare with a relaxed forehand grip. Move early enough that the shuttle is not already falling behind you. For a left-handed player, mirror the right-handed positions shown in most demonstrations.
Contact and finish: Reach high above and slightly in front of your racket shoulder. Coordinate the body turn and arm action, let the racket follow through, then recover your balance and prepare for the reply. Think of a connected throwing action rather than an isolated wrist flick.
Target and cue: Aim well inside the rear boundary while learning. “High, deep, then ready” is a useful practice reminder.
Common mistake: Swinging harder after letting the shuttle drop behind your head. Ask for a higher, easier feed and work on arriving earlier. Sport Singapore's forehand-clear guide describes preparation, contact, follow-through, and recovery.
How is a drop different from a net shot?
A drop is usually an overhead shot from the rear court into the opponent's front court. A net shot is played from near your own net into their front court. The destination can look similar; the distance and hitting action are different.
Start: Prepare for an overhead shot much as you would for a clear. Reach the shuttle in a position where you can control the racket rather than stretch desperately for it.
Contact and finish: Meet it high and slightly in front, with a controlled action that takes speed out of the return. Allow the action to finish and get ready for a possible net reply. Do not stop moving simply to watch whether the shot lands.
Target and cue: Choose a generous front-court target before trying to skim the tape. Think “same preparation, softer destination.”
When to use it: A drop can make an opponent move forward after they have been covering the rear court.
Common mistake: Guiding the shuttle so slowly that it rises high over the net. You need enough forward travel to cross, not just a gentle touch. The BWF Shuttle Time manual, Module 7, illustrates overhead drops and their shared preparation with clears.
When should a beginner try a smash?
A smash attacks the shuttle downward from a high contact. Try a controlled standing smash once you can reach an easy overhead feed in balance. A jump smash is unnecessary for learning the basic direction and timing.
Start: Get into position early and prepare the racket overhead. Choose an open target within the court rather than trying to hit through your practice partner.
Contact and finish: Meet the shuttle high and farther in front than for a typical defensive clear. Use a coordinated body and arm action to send it down. Follow through naturally and recover, because a smash can come back.
Target and cue: Begin at a comfortable pace: “Down into space, then ready.” Increase speed only while you can repeat the placement.
When to use it: A short, high return can offer a downward attacking opportunity. A shuttle already behind you does not become a good smash opportunity just because you swing harder.
Common mistake: Trying maximum power before controlling contact. Use a gentler feed, keep your feet on the floor, and notice where the shuttle lands. The BWF Level 1 Coaches' Manual explains overhead attacking strokes with preparation, hitting, and follow-through sequences.
What is a drive, and why is the swing compact?
A drive sends the shuttle on a relatively flat path, often from the middle of the court. It is useful when the shuttle is not high enough for a clear downward attack and you want to avoid lifting it. Both forehand and backhand drives are possible.
Start: Hold the racket ready in front and change grip to suit the side of contact. Leave enough space between your body and the shuttle to make a controlled return.
Contact and finish: Use a short action to meet the shuttle in front or slightly to the side. Recover the racket promptly. A large overhead-style backswing makes a quick exchange harder to manage.
Target and cue: For practice, aim a flat return toward your partner's reachable racket area, not their face or body. Think “short swing, racket ready.”
Common mistake: Treating “flat” as an instruction to hit as hard as possible. Reduce the pace until both players can prepare for the next return. Sport Singapore's shot overview describes drives as flat shots available on both sides.
How does a lift differ from a clear?
A lift sends a shuttle upward from a low contact, commonly near the net, toward the rear court. A clear usually starts with overhead contact farther back. Both can move an opponent backward, but they solve different incoming-shot situations.
Start: Approach a gentle feed with the racket in front. Choose a forehand or backhand grip according to where you meet the shuttle.
Contact and finish: Reach in balance, bring the racket below the shuttle, and send it upward and forward. Let the action finish, regain your position, and raise the racket for the next shot.
Target and cue: Choose a high arc into a broad rear-court area. “Under, up, and deep” is more useful than thinking only about distance.
When to use it: A shuttle that has fallen low near the net may need height to clear the opponent and give you time to recover.
Common mistake: Sending a low, short lift into an easy attacking position. Begin with an easy feed and prioritize height and contact before pushing for full-court length.
How do you play a simple net shot?
A net shot guides the shuttle from your front court just across the net into the opponent's front court. Its purpose is to keep the return short and low. For a beginner, a repeatable gentle return matters more than spinning the shuttle tightly over the tape.
Start: Bring the racket forward while approaching the shuttle. Choose a relaxed grip for the forehand or backhand contact rather than holding one grip rigidly throughout the rally.
Contact and finish: Meet the shuttle in front with a small, controlled action. Let your movement help carry the return, then recover your balance with the racket ready.
Target and cue: Aim into a comfortable space beyond the net. Think “reach, guide, and recover.” You do not need to touch the tape to play a useful net shot.
When to use it: Try it when you reach a front-court shuttle with enough control to keep the return short.
Common mistake: Adding a big swing to a small-distance shot. Reduce the action and ask for a predictable feed until the contact becomes repeatable.
How can two beginners practice these shots together?
Use cooperative feeds and broad targets before competitive rallies. Choose one hitter and one feeder, agree on an easy pace, and reset after a few attempts. The following drills are suggested practice formats, not official tests or promises of progress.
- Front-court choices: One player gently feeds over the net. The hitter calls “net” or “lift” before returning. Start with one choice, then alternate. Swap roles after several attempts.
- High and short: Feed an easy overhead shuttle. The hitter chooses a high clear or a controlled drop. Count returns reaching the intended area, rather than awarding points for speed.
- Flat exchanges: Stand at a manageable distance on opposite sides of the net and try gentle drives. Stop if the exchange becomes rushed. A shorter backswing is the focus.
- Controlled attack: Feed a high, comfortable shuttle for a standing smash into open court. Let it land, collect it after play stops, and repeat. Add a cooperative return only when both players are ready.
Keep spare shuttles off the playing area. Pause when someone needs to collect them. A feed that repeatedly forces a rushed or awkward reach is too difficult for the current exercise; change the feed before blaming the shot.
Frequently asked questions
Which badminton shot should I learn first?
Start with controlled contact, simple net play, and lifts alongside a basic serve. Add overhead shots through easy feeds. You can change the order with a coach; there is no need to master a smash before enjoying rallies.
Are a clear and a lob the same thing?
“Lob” is sometimes used loosely for a high shot. Ask whether the speaker means an overhead clear or an underarm lift. Naming the starting contact is more useful than arguing about an informal label.
Is a drop just a weak smash?
No. A drop deliberately targets the front court with controlled speed. A poorly struck smash might also fall short, but the intended shot and preparation matter. Practice the drop as its own placement task.
Should I flick my wrist for every shot?
No. Grips, fingers, forearm movement, arm action, and body position work together differently for different shots. “Wrist only” is an unhelpful instruction. Ask for a demonstration of the whole action.
Do I need to jump to smash?
No. A standing smash lets you work on a high contact, downward direction, and recovery. Add complexity only when you can control the simpler action. Jumping does not replace timing.
Is every high shot defensive?
No. Height alone does not describe the whole tactic. Placement, pace, and the opponent's position matter. For beginner practice, a high deep return is often a useful way to create more time.
Can I use these shots in both singles and doubles?
Yes. All six appear in both formats, although shot choices and court coverage vary. Learn the basic contact and destination first; later, connect each choice to your partner's position and the space available.
Why do my overhead shots keep going out?
Reduce the pace and use a target comfortably inside the boundary. Ask someone to check your position and contact point. Change one thing at a time rather than switching grip, footwork, and swing on every attempt.
What should you practice next?
Choose two contrasting destinations: a net shot and lift from the front, or a clear and drop from farther back. Agree on an easy feed, identify the target, and notice whether you can recover for another shot.
That gives every return a purpose. Build the direction and repeatability first; power and more demanding choices can follow.
Continue learning
- How to Start Playing Badminton: A Complete Beginner’s Guide
- Singles vs. Doubles Badminton: Rules, Court Coverage, and Playing Style
- Badminton Terms Explained: A Beginner’s Glossary
Explore the next step: movement and recovery and doubles positioning.